Elasticsearch 分析器使用入门指南

ElasticSearch 是一个基于 Lucene 构建的开源、分布式、RESTful 搜索引擎,能够达到实时搜索,并且稳定、可靠、快速。而其中最常用的全文检索【match 匹配】功能,在很多场景都有应用,这当然离不开分析器【Analyzer】,本文简单总结一下相关内容,入门级别。开发环境基于 v5.6.8

初识分析器

首先需要先了解一下分析器的概念,以及与此相关的几个术语。

做全文检索前就需要对文档分析、建索引,其中从文档中提取词元【Token】的算法称为分词器【Tokenizer】,在分词前预处理字符串的算法称为字符过滤器【Character Filter】,进一步处理词元的算法称为词元过滤器【Token Filter】,最后得到词【Term,最小单元,决定着搜索时能否命中】。而这整个分析流程以及对应的算法称为分析器【Analyzer】,我们对文档的某个字段可以指定分析器,以达到我们全文检索的需求。

这里注意,我们在日常口语中会把 Analyzer 称为分词器,例如给某个字段指定一个分词器,这其实是有误导的【因为分词器只是分析器中的一个重要的组成部分】。

文档包含词的数量称为词频【Frequency】,搜索引擎会建立词与文档的索引,称为 倒排索引 Inverted Index】,这是 ElasticSearch 中的基本概念。

下面使用一张图片来简单描述一下分析器的分析流程,更加直观:

分析器流程

Analyzer 按顺序做三件事:

  1. 使用 CharacterFilter 过滤字符,可以添加、删除或更改字符来转换字符流,一个分析器可以有多个字符过滤器;
  2. 使用 Tokenizer 分词,接收字符流,将其分解成单独的词元,并输出词元流,一个分析器只能有一个分词器;
  3. 使用 TokenFilter 过滤词元,接收词元流,并可以添加、删除或修改词元,不允许更改每个词元的位置或字符偏移量,一个分析器可有多个 TokenFilter 过滤器,并按顺序应用。

关于词【Term】,我们也会称之为单词,为了避免歧义,本文统一称之为词。

Elasticsearch 默认提供了多种 CharacterFilterTokenizerTokenFilterAnalyzer【可以直接使用的分析器】,当然,我们也可以下载第三方的 Analyzer 组件,或者根据业务场景开发自定义的组件。

官网链接如下:

Elasticsearch 中的 Analyzer 一般会提供一些配置,我们按照需要使用,如 standard Analyzer 提供了 stop_words 停用词过滤配置,这样我们就可以提供一些噪音词【例如特定行业数据中可能有歧义的词,不想被分析器输出为词元】,用于分析时剔除。

官方介绍:

The standard analyzer divides text into terms on word boundaries, as defined by the Unicode Text Segmentation algorithm. It removes most punctuation, lowercases terms, and supports removing stop words.

下面列举一个简单示例,为 standard Analyzer 添加 stop_words

1
2
3
4
5
6
7
8
9
10
11
12
13
PUT /my-index-post/_settings
{
"index": {
"analysis": {
"analyzer": {
"standard": {
"type": "standard",
"stop_words": ["is", "a", "ha", "aha"]
}
}
}
}
}

以上我们就构造了名为 standardstandard Analyzer 类型的带停用词列表的分析器。

还有其它更多的分析器请读者参考上面的官方文档,例如 Whitespace Analyzer,即空格分析器,遇到任何空格字符时都会将文本分为多个词元,并且不会把词元转换为小写字母【区分大小写】。

自定义分析器

通过上面的讲解,我们发现也可以通过 Setting API 来构造组合自定义的 Analyzer,此时需要我们指定 Character FilterTokenizerToken Filter 等基础规则组件。读者可以参考官网示例:analysis-custom-analyzer

请看以下例子:

1
2
3
4
5
6
7
8
9
10
11
12
13
14
15
16
PUT my-index-post/_settings

{
"index": {
"analysis": {
"analyzer": {
"custom_analyzer": {
"type": "custom",
"char_filter": ["html_strip"],
"tokenizer": "standard",
"filter": ["lowercase", "stop"]
}
}
}
}
}

我们构造了一个名称为 custom_analyzer 的分析器,其中 type 用来告诉 Elasticsearch 我们要自定义一个分析器,char_filter 指定了 Character Filtertokenizer 指定了 Tokenizerfilter 指定了 Token Filter

根据我们的设置,它会完成以下流程:

  1. 使用 html_strip 字符过滤器,移除 html 标签;
  2. 使用 standard 分词器,进行分词;
  3. 使用 lowercase 词元过滤器,把大写字母转为小写字母;
  4. 使用 stop 词元过滤器,过滤掉停用词。

这样我们的自定义分析器就构造完成,可以根据名称使用它了。

注意,创建自定义分析器之前,需要先关闭索引,创建成功后再打开,否则无法创建成功。

实战演示

设置字段的分析器

首先说明,在创建索引时,我们针对特殊的字段都会指定分析器,例如内容、标题这种长文本,需要全文检索。因此,我们在配置 _mapping 时,就可以指定分析器了,可以为单个字段指定,也可以使用动态模版指定【更加灵活】。

下面为示例:

1
2
3
4
5
6
7
8
9
10
11
12
13
14
15
16
17
18
19
20
21
22
23
24
25
26
27
28
29
30
31
32
33
34
35
36
PUT http://localhost:9202/my-index-post/_mapping/post/
{
"_all": {
"enabled": false
},
"dynamic_templates": [
{
"title": {
"mapping": {
"analyzer": "custom_analyzer",
"type": "text"
},
"match": "*_title"
}
},
{
"content": {
"mapping": {
"analyzer": "custom_analyzer",
"type": "text"
},
"match": "*_content"
}
}
],
"properties": {
"title": {
"type": "text",
"analyzer": "custom_analyzer"
},
"content": {
"type": "text",
"analyzer": "custom_analyzer"
}
}
}

使用 dynamic_templates 指定了动态模版,字段名称满足 *_title*_content 模版都会被设置为 custom_analyzer 分析器。

而在 properties 中,直接设置了 titlecontent 这两个字段的分析器为 custom_analyzer

此外,如果希望对一个字段使用多种分析器,这样就可以得到不同的分析结果,也是可行的,利用 multi-fields 特性,其实是生成了多个子字段,参考:multi-fields

下面为示例:

1
2
3
4
5
6
7
8
9
10
11
12
13
14
15
16
17
18
19
20
21
22
23
24
25
26
27
28
29
30
31
32
33
34
35
36
37
38
39
40
41
42
43
44
45
46
47
48
49
50
51
52
53
54
55
56
57
58
59
60
61
62
63
64
65
66
67
68
69
70
71
72
73
74
75
76
PUT http://localhost:9202/my-index-post/_mapping/post/
{
"_all": {
"enabled": false
},
"dynamic_templates": [
{
"title": {
"mapping": {
"analyzer": "custom_analyzer",
"type": "text",
"fields": {
"text1": {
"type": "text",
"analyzer": "standard"
},
"text2": {
"type": "text",
"analyzer": "english"
}
}
},
"match": "*_title"
}
},
{
"content": {
"mapping": {
"analyzer": "custom_analyzer",
"type": "text",
"fields": {
"text1": {
"type": "text",
"analyzer": "standard"
},
"text2": {
"type": "text",
"analyzer": "english"
}
}
},
"match": "*_content"
}
}
],
"properties": {
"title": {
"type": "text",
"analyzer": "custom_analyzer",
"fields": {
"text1": {
"type": "text",
"analyzer": "standard"
},
"text2": {
"type": "text",
"analyzer": "english"
}
}
},
"content": {
"type": "text",
"analyzer": "custom_analyzer",
"fields": {
"text1": {
"type": "text",
"analyzer": "standard"
},
"text2": {
"type": "text",
"analyzer": "english"
}
}
}
}
}

利用 fields 属性,再分别添加 text1text2 两个字段,并且指定不同的分析器,需要查询时指定字段名为 titletitle.text1title.text2 即可。

查询

查询时也可以指定分析器,这样的话本次查询生成的词是单独的规则,可能无法匹配到索引数据时生成的词。如果不配置,则默认与索引数据时的分析器一致,这也符合用户的使用习惯,因为基本不会有人特别去指定查询的分析器。

注意,给搜索指定分析器后,实际是对指定的文本进行分析后产生词,用这些词去匹配数据文档中的字段,例如指定文本 iPhone8 搜索,如果指定使用 standard 分析器,文本会被分析为 iphone8,而如果索引数据使用的是 wordsEN 分析器【iPhone8 被分析为 iphone8】,会造成无法命中。

利用 analyzer 属性指定:

1
2
3
4
5
6
7
8
9
10
11
POST my-index-post/_search
{
"query": {
"match": {
"content":{
"query": ",",
"analyzer": "standard"
}
}
}
}

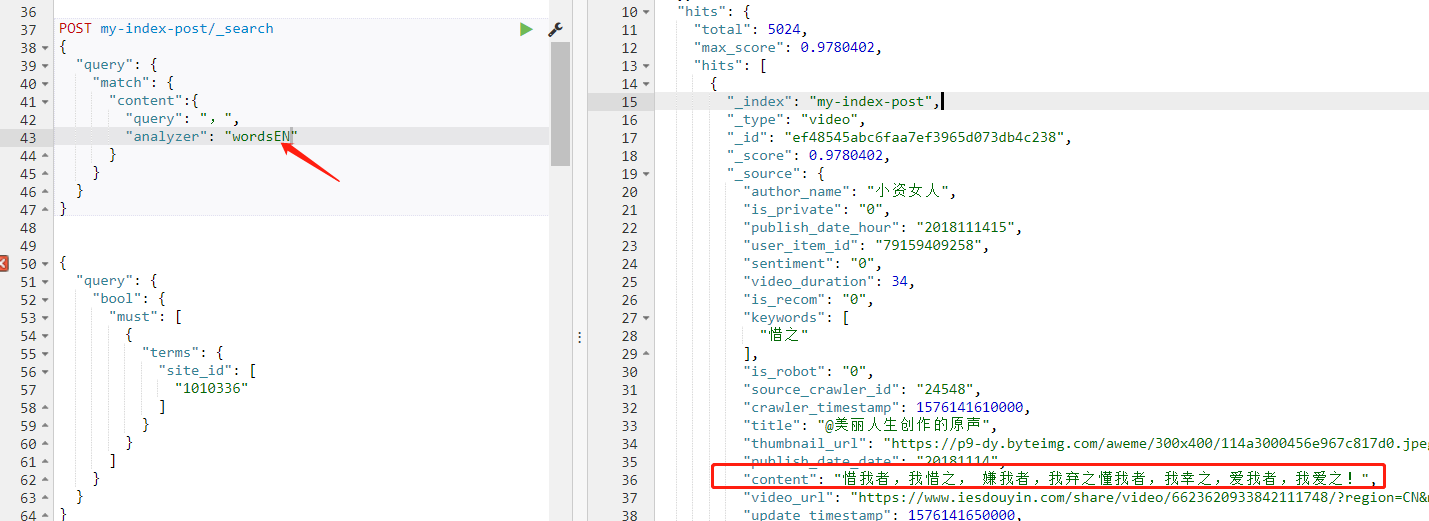
查询数据指定 standard 无结果

我这里 content 字段配置的分析器是 wordsEN,索引数据时会保留标点符号,而使用 standard 分析器查询时,由于 standard 分析器移除了标点符号,那么此时的词等价于空串了,所以无法命中数据。

换一个分析器查询,就可以查到数据了:

1
2
3
4
5
6
7
8
9
10
11
POST my-index-post/_search
{
"query": {
"match": {
"content":{
"query": ",",
"analyzer": "wordsEN"
}
}
}
}

查询数据指定 wordsEN 有结果

下面再举一个典型的例子,虽然指定的文本在数据中并没有出现,但是通过指定查询的分析器【查询时会过滤掉标点符号】,也可以命中数据。

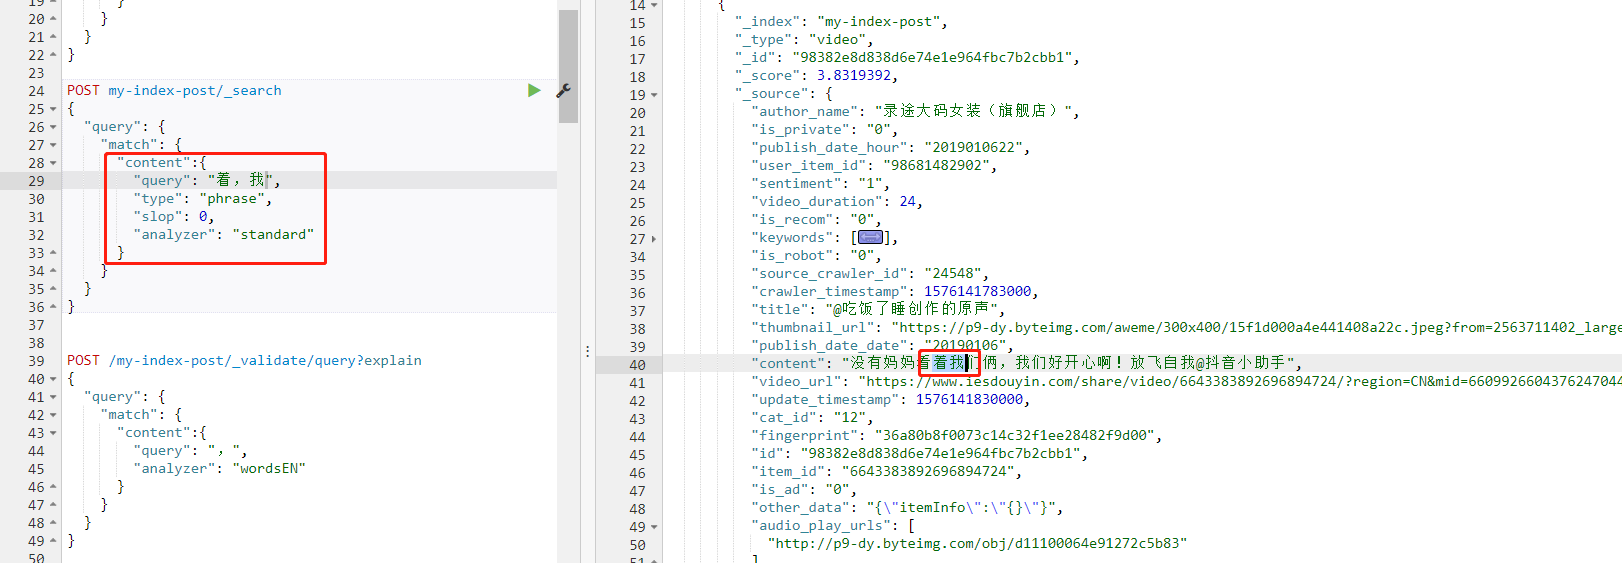
想查询 着,我 这个短语,如果是正常的情况, 应该出现在两个短句中,但是通过指定分析器 standard,就可以把逗号移除,从而命中带有 着我 的数据【这也改变了本来的查询含义,即人理解的含义,更多参考后面的 误解 小节】:

1
2
3
4
5
6
7
8
9
10
11
12
13
POST my-index-post/_search
{
"query": {
"match": {
"content":{
"query": " 着,我 & quot;,
"type": "phrase",
"slop": 0,
"analyzer": "standard"
}
}
}
}

典型例子

此外还有一种配置方法,除了可以给字段配置索引数据时的分析器,还可以给字段指定查询时的分析器,利用 search_analyzer 属性【如果不配置则默认与索引数据时的分析器一致,如果用户查询时又手动指定了分析器则使用用户指定的,读者可以看上面的例子】:

1
2
3
4
5
6
7
8
9
10
11
12
PUT /my-index-post/_mapping/post
{
"post": {
"properties": {
"title": {
"type": "text",
"analyzer": "english",
"search_analyzer": "standard"
}
}
}
}

不同分析器的效果

对于集群已经安装的分析器,可以直接使用,利用 _analyze 接口即可,可以方便测试分析效果。下面使用文本 出发,123,let's go!来自 iPhone8 的客户端。 演示,这段文本里面包含了中文、标点符号、数字、小写单词、大写字母,很具有代表性。

发送请求:

1
2
3
4
5
6
7
8
9
10
11
12
POST _analyze
{
"text":" 出发,123,let's go!来自 iPhone8 的客户端。",
"analyzer":"wordsEN"
}

指定索引也可以
POST my-index-post/_analyze
{
"text":" 出发,123,let's go!来自 iPhone8 的客户端。",
"analyzer":"wordsEN"
}

返回结果:

1
2
3
4
5
6
7
8
9
10
11
12
13
14
15
16
17
18
19
20
21
22
23
24
25
26
27
28
29
30
31
32
33
34
35
36
37
38
39
40
41
42
43
44
45
46
47
48
49
50
51
52
53
54
55
56
57
58
59
60
61
62
63
64
65
66
67
68
69
70
71
72
73
74
75
76
77
78
79
80
81
82
83
84
85
86
87
88
89
90
91
92
93
94
95
96
97
98
99
100
101
102
103
104
105
106
107
108
109
110
111
112
113
114
115
116
117
118
119
120
121
122
123
124
125
126
127
128
129
130
131
132
133
134
135
136
137
138
139
140
141
142
143
144
{
"tokens": [
{
"token": " 出 & quot;,
"start_offset": 0,
"end_offset": 1,
"type": "word",
"position": 0
},
{
"token": " 发 & quot;,
"start_offset": 1,
"end_offset": 2,
"type": "word",
"position": 1
},
{
"token": ",",
"start_offset": 2,
"end_offset": 3,
"type": "word",
"position": 2
},
{
"token": "123",
"start_offset": 3,
"end_offset": 6,
"type": "word",
"position": 3
},
{
"token": ",",
"start_offset": 6,
"end_offset": 7,
"type": "word",
"position": 4
},
{
"token": "let",
"start_offset": 7,
"end_offset": 10,
"type": "word",
"position": 5
},
{
"token": "'",
"start_offset": 10,
"end_offset": 11,
"type": "word",
"position": 6
},
{
"token": "s",
"start_offset": 11,
"end_offset": 12,
"type": "word",
"position": 7
},
{
"token": " ",
"start_offset": 12,
"end_offset": 13,
"type": "word",
"position": 8
},
{
"token": "go",
"start_offset": 13,
"end_offset": 15,
"type": "word",
"position": 9
},
{
"token": "!",
"start_offset": 15,
"end_offset": 16,
"type": "word",
"position": 10
},
{
"token": " 来 & quot;,
"start_offset": 16,
"end_offset": 17,
"type": "word",
"position": 11
},
{
"token": " 自 & quot;,
"start_offset": 17,
"end_offset": 18,
"type": "word",
"position": 12
},
{
"token": "iphone",
"start_offset": 18,
"end_offset": 24,
"type": "word",
"position": 13
},
{
"token": "8",
"start_offset": 24,
"end_offset": 25,
"type": "word",
"position": 14
},
{
"token": " 的 & quot;,
"start_offset": 25,
"end_offset": 26,
"type": "word",
"position": 15
},
{
"token": " 客 & quot;,
"start_offset": 26,
"end_offset": 27,
"type": "word",
"position": 16
},
{
"token": " 户 & quot;,
"start_offset": 27,
"end_offset": 28,
"type": "word",
"position": 17
},
{
"token": " 端 & quot;,
"start_offset": 28,
"end_offset": 29,
"type": "word",
"position": 18
},
{
"token": "。",
"start_offset": 29,
"end_offset": 30,
"type": "word",
"position": 19
}
]
}

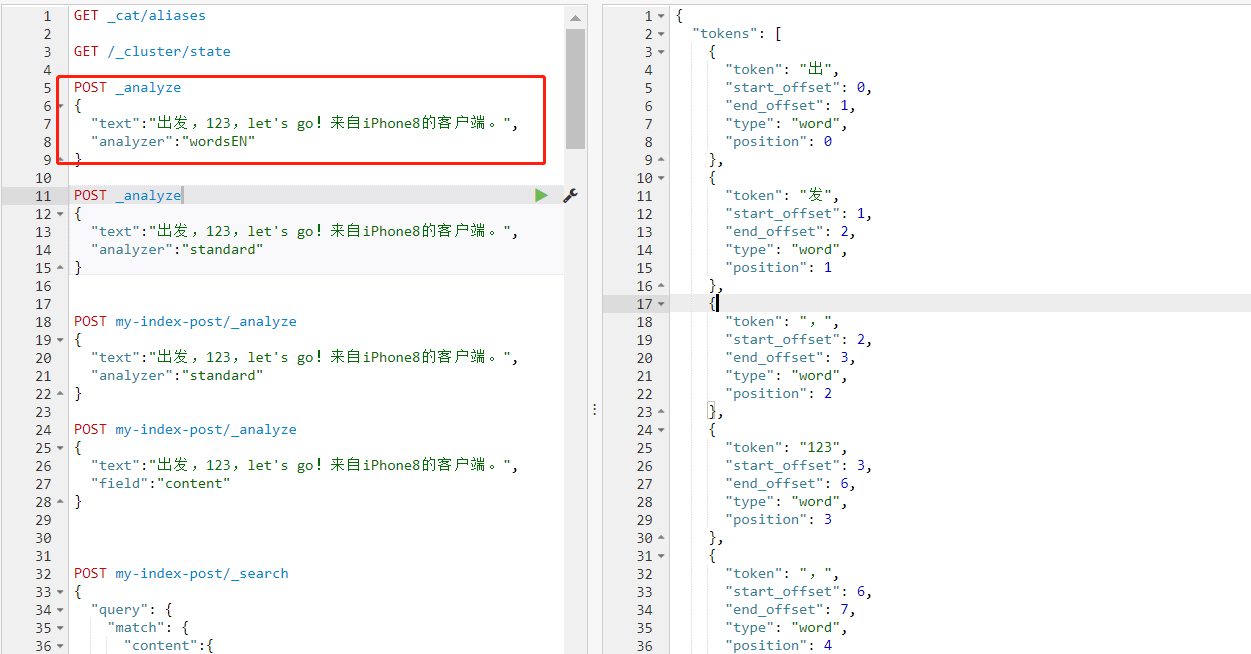
查看分析结果指定 wordsEN

wordsEN 分析器把所有的字符全部保留了,把大写字母转为了小写字母,并且 iPhone8 被拆开为 iphone8

更换为 standard 分析器:

1
2
3
4
5
POST _analyze
{
"text":" 出发,123,let's go!来自 iPhone8 的客户端。",
"analyzer":"standard"
}

返回结果:

1
2
3
4
5
6
7
8
9
10
11
12
13
14
15
16
17
18
19
20
21
22
23
24
25
26
27
28
29
30
31
32
33
34
35
36
37
38
39
40
41
42
43
44
45
46
47
48
49
50
51
52
53
54
55
56
57
58
59
60
61
62
63
64
65
66
67
68
69
70
71
72
73
74
75
76
77
78
79
80
81
82
83
84
85
86
87
88
{
"tokens": [
{
"token": " 出 & quot;,
"start_offset": 0,
"end_offset": 1,
"type": "<IDEOGRAPHIC>",
"position": 0
},
{
"token": " 发 & quot;,
"start_offset": 1,
"end_offset": 2,
"type": "<IDEOGRAPHIC>",
"position": 1
},
{
"token": "123",
"start_offset": 3,
"end_offset": 6,
"type": "<NUM>",
"position": 2
},
{
"token": "let's",
"start_offset": 7,
"end_offset": 12,
"type": "<ALPHANUM>",
"position": 3
},
{
"token": "go",
"start_offset": 13,
"end_offset": 15,
"type": "<ALPHANUM>",
"position": 4
},
{
"token": " 来 & quot;,
"start_offset": 16,
"end_offset": 17,
"type": "<IDEOGRAPHIC>",
"position": 5
},
{
"token": " 自 & quot;,
"start_offset": 17,
"end_offset": 18,
"type": "<IDEOGRAPHIC>",
"position": 6
},
{
"token": "iphone8",
"start_offset": 18,
"end_offset": 25,
"type": "<ALPHANUM>",
"position": 7
},
{
"token": " 的 & quot;,
"start_offset": 25,
"end_offset": 26,
"type": "<IDEOGRAPHIC>",
"position": 8
},
{
"token": " 客 & quot;,
"start_offset": 26,
"end_offset": 27,
"type": "<IDEOGRAPHIC>",
"position": 9
},
{
"token": " 户 & quot;,
"start_offset": 27,
"end_offset": 28,
"type": "<IDEOGRAPHIC>",
"position": 10
},
{
"token": " 端 & quot;,
"start_offset": 28,
"end_offset": 29,
"type": "<IDEOGRAPHIC>",
"position": 11
}
]
}

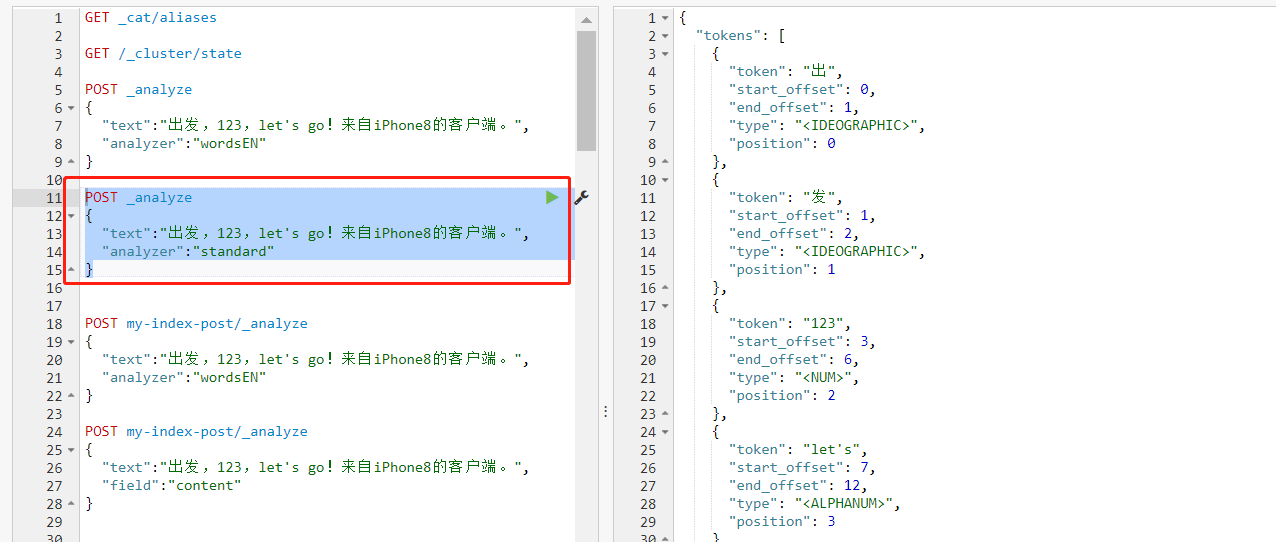
查看分析结果指定 standard

注意到,标点符号被剔除;缩写词 let's 没有拆开;iPhone8 被转为小写字母,但是字母、数字没有拆开。

这里可以留意到,尽管分析器剔除了一些字符,但是每个词的位置并没有变化,例如 123 的位置 start_offset 是 3,也就是在原文中的位置,并没有因为它前面的逗号被剔除而变为 2,这是很重要的。

另外,注意一下 position 的值,它才是词元的位置,由于过滤一些字符后,position 的值和 *_offset 值的对应关系变化了,这可能会引起一些误解,因为关系到搜索时的命中结果【指定步长 slop 的短语查询,下面会有特别记录,见 误解 小节】。

如果在一个索引中已经给某些字段指定了分析器,则可以直接查看赋值文本给这个字段后的分析结果。例如索引 my-index-post 中的 content 字段已经被设置分析器为 wordsEN,此时假如把 content 赋值为文本 出发,123,let's go!来自 iPhone8 的客户端。,看看分析结果。

此时不需要用 analyzer 指定分析器了,直接用 field 指定字段名即可:

1
2
3
4
5
POST my-index-post/_analyze
{
"text":" 出发,123,let's go!来自 iPhone8 的客户端。",
"field":"content"
}

分析结果的误解

上面在 查询 小节已经举了一个查询时指定分析器,可能会改变查询原义【人理解的含义】的例子,即查询时指定分析器可能会改变指定内容的分析结果【着,我 变成了 着我】,这会在一定情况下引起误解。

同理,索引数据时指定的分析器也会改变分析的结果【部分字符会被移除,造成分析结果的词元位置变化】,例如以下示例。

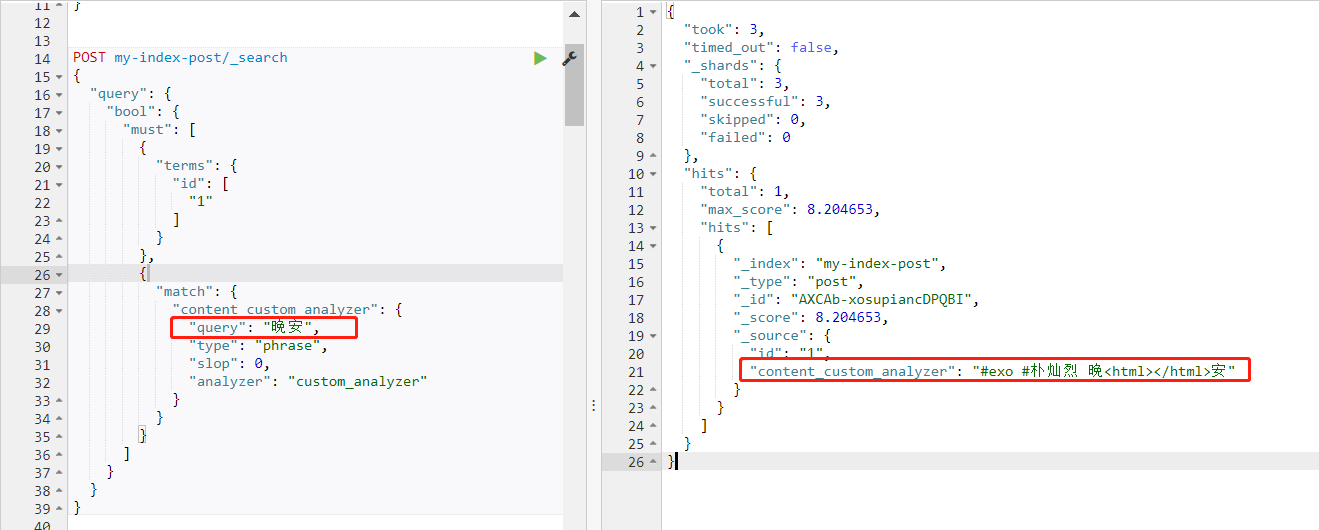
使用上面的自定义分析器,把带 html 标签的文本内容过滤,分析出来词元结果,然后利用纯中文的词组再去查询,虽然查询条件中没有指定完全一样的文本【不带 html 标签】,但是也可以匹配命中。

1
2
3
4
5
6
7
8
9
10
11
12
13
14
15
16
17
18
19
20
21
22
23
24
25
26
POST my-index-post/_search
{
"query": {
"bool": {
"must": [
{
"terms": {
"id": [
"1"
]
}
},
{
"match": {
"content_custom_analyzer": {
"query": " 晚安 & quot;,
"type": "phrase",
"slop": 0,
"analyzer": "custom_analyzer"
}
}
}
]
}
}
}

查询结果

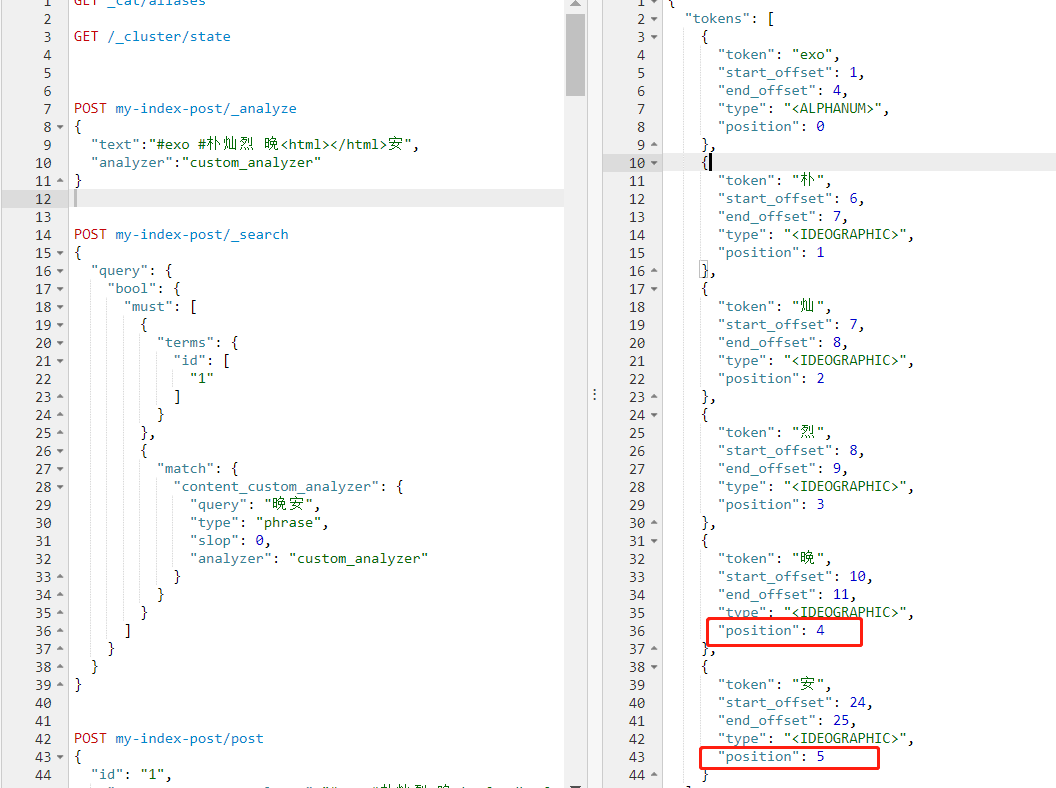
这就是因为分析结果的词元中已经没有了 html 标签【注意看词元的位置 position】。

1
2
3
4
5
6
7
8
9
10
11
12
13
14
15
16
17
18
19
20
21
22
23
24
25
26
27
28
29
30
31
32
33
34
35
36
37
38
39
40
41
42
43
44
45
46
{
"tokens": [
{
"token": "exo",
"start_offset": 1,
"end_offset": 4,
"type": "<ALPHANUM>",
"position": 0
},
{
"token": " 朴 & quot;,
"start_offset": 6,
"end_offset": 7,
"type": "<IDEOGRAPHIC>",
"position": 1
},
{
"token": " 灿 & quot;,
"start_offset": 7,
"end_offset": 8,
"type": "<IDEOGRAPHIC>",
"position": 2
},
{
"token": " 烈 & quot;,
"start_offset": 8,
"end_offset": 9,
"type": "<IDEOGRAPHIC>",
"position": 3
},
{
"token": " 晚 & quot;,
"start_offset": 10,
"end_offset": 11,
"type": "<IDEOGRAPHIC>",
"position": 4
},
{
"token": " 安 & quot;,
"start_offset": 24,
"end_offset": 25,
"type": "<IDEOGRAPHIC>",
"position": 5
}
]
}

对比文本可能会有误解

如果用户只是查看 content_custom_analyzer 字段的内容,就很容易造成误解,可能会发出 文本明明不一致怎么会命中了呢 的疑问,背后其实是分析器在起作用。

备注

需要注意,Elasticsearch 节点层面的默认分析器设置已经废弃,不支持了,也就是说在 elasticsearch.yml 中配置如下内容无效,并且会导致 Elasticsearch 节点启动失败:

1
2
3
4
5
index:
analysis:
analyzer:
simple_analyzer:
type: standard

有关说明如下:

1
2
3
4
5
6
7
8
9
10
11
Found index level settings on node level configuration.

Since elasticsearch 5.x index level settings can NOT be set on the nodes
configuration like the elasticsearch.yaml, in system properties or command line

arguments.In order to upgrade all indices the settings must be updated via the
/${index}/_settings API. Unless all settings are dynamic all indices must be clo
sed
in order to apply the upgradeIndices created in the future should use index temp
lates
to set default values.

因此,建议在索引层面动态设置,即使用索引模版针对某些字段设置【参考上面的 实战演示 中举例】。

虾丸派 wechat
扫一扫添加博主,进技术交流群,共同学习进步
永不止步
0%