Search Guard 安装部署实践

最近 Elasticsearch 集群出了一个小事故,根本原因在于对集群请求的监控不完善,以及对 Elasticsearch 访问权限无监控【目前是使用 LDAP 账号就可以登录访问,而且操作权限很大,这有很大的隐患】。因此,最近准备上线 Search Guard,先在测试环境部署安装了一遍,并测试了相关服务,整理了如下安装部署文档,以供读者参考。

开发环境基于 Elasticsearch v5.6.8Search Guard v5.6.8-19.1Java v1.8

相关包、文档参考

Search Guard 下载

Search Guard 首页:Search Guard versions

仓库在线包:repositories ,也可以使用坐标:com.floragunn:search-guard-5:5.6.8-19.1

此外,这个官方的在线包没了:search-guard-5 ,版本选择:v5.6.8-19.1

证书工具下载

证书工具 tlstoolsearch-guard-tlstool ,版本选择:v1.7

相关文档参考

offline-tls-tooloffline-tls-tool

Search Guardinstallation-windows

Search Guard sgadmin.sh 命令参数:sgadmin

回滚

安装部署过程中,避免不了小概率的异常,所以需要考虑回滚操作。

Elasticsearch 如果需要回滚,不需要卸载插件,不需要删除配置,直接在 Elasticsearch 配置中添加参数,关闭 Search Guard 插件的使用:searchguard.disabled: true,再重启 Elasticsearch 集群即可。

如果有其它强关联的业务服务,提前准备好对应的分支或者 tag,重新部署即可,不需要变更代码。

部署操作

前提:不支持单台停机滚动安装,需要重启所有 Elasticsearch 节点,当然,停机时间很短暂。

以下记录安装、配置、部署流程。

提示:所有的证书文件、配置文件【包括 Elasticsearch 节点的、Search Guard 插件的】都可以提前准备好,Search Guard 插件也可以提前安装好。重启 Elasticsearch 集群后,在黄色状态下,开始激活 Search Guard 插件,可能需要一点时间,几分钟到十几分钟。

准备证书

证书需要提前生成好,需要为所有的 Elasticsearch 节点都生成证书,即每个节点都有自己独立的证书文件。

附件为配置示例以及生成的证书示例,已经被我上传至 GitHub,读者可以下载查看:证书配置以及证书文件 ,测试主机为:dev4、dev5、dev6,域名为:playpi.org

下载解压

解压到本地磁盘中,任何主机都可以,提前做好。

注意每个目录的作用:

  • config,配置文件,需要根据自己的情况更改一些配置
  • tools,脚本文件,生成使用
  • deps,依赖文件,工具需要的依赖包

准备配置文件

配置 ca 证书、Elasticsearch 节点、客户端信息,Elasticsearch 节点信息包含:namedndnsip,具体参考附件内容。

以下给出 Elasticsearch 节点、客户端信息的示例:

1
2
3
4
5
6
7
8
9
10
11
12
13
14
15
16
17
18
19
20
21
22
23
24
25
26
27
28
29
30
31
32
33
34
35
###
### Nodes
###
#
# Specify the nodes of your ES cluster here
#
nodes:
- name: dev4
dn: CN=dev4.playpi.com,OU=Ops,O=Playpi Com\, Inc.,DC=playpi,DC=com
ip: 192.168.1.4
dns: dev4.playpi.com
- name: dev5
dn: CN=dev5.playpi.com,OU=Ops,O=Playpi Com\, Inc.,DC=playpi,DC=com
ip: 192.168.1.5
dns: dev5.playpi.com
- name: dev6
dn: CN=dev6.playpi.com,OU=Ops,O=Playpi Com\, Inc.,DC=playpi,DC=com
ip: 192.168.1.6
dns: dev6.playpi.com

###
### Clients
###
#
# Specify the clients that shall access your ES cluster with certificate authentication here
#
# At least one client must be an admin user (i.e., a super-user). Admin users can
# be specified with the attribute admin: true
#
clients:
- name: client-admin
dn: CN=client-admin.playpi.com,OU=Ops,O=Playpi Com\, Inc.,DC=playpi,DC=com
admin: true
- name: client-custom
dn: CN=client-custom.playpi.com,OU=Ops,O=Playpi Com\, Inc.,DC=playpi,DC=com

生成证书文件

执行解压目录内的工具:./tools/sgtlstool.sh -c <path>/tlsconfig.yml -ca -crt,生成证书文件,输出目录为 out

参数含义:

  • -c,指定配置文件位置
  • -ca,创建并指定本地证书授权中心【如果已经存在本地证书授权中心则不需要】
  • -crt,使用本地证书授权中心创建证书

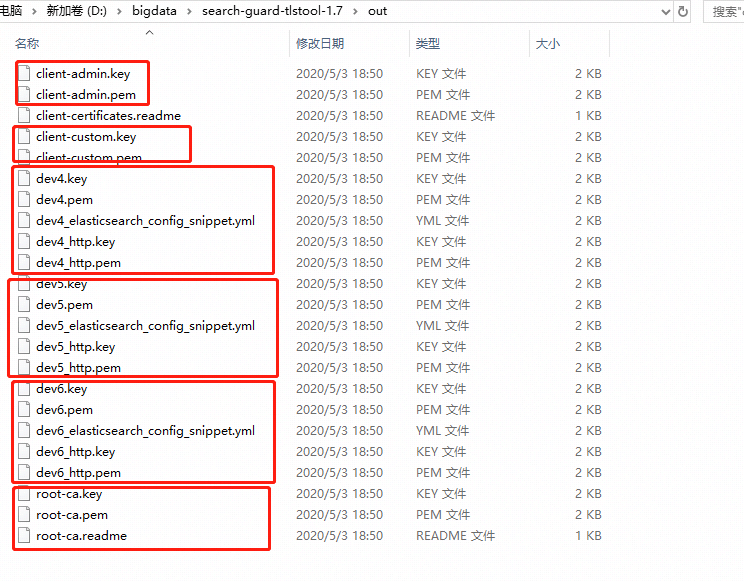
除了 root 证书总计有 3 个文件【包含 readme】,client 总计有 5 个文件【包含 readme】,此外每个 Elasticsearch 节点对应有 5 个文件【包含 config】。

创建成功后输出日志:

1
2
3
4
5
6
7
Root certificate has been sucessfully created.
The passwords of the private key files have been auto generated. You can find the passwords in root-ca.readme.

Created 6 node certificates.
Passwords for the private keys of the node certificates have been auto-generated. The passwords are stored in the config snippet files.
Created 2 client certificates.
Passwords for the private keys of the client certificates have been auto-generated. The passwords are stored in the file "client-certificates.readme"

输出证书文件

生成证书文件一览

备注 Windows 操作:

1
.\tools\sgtlstool.bat -c .\config\tlsconfig.yml -ca -crt

检查证书文件

上面的截图中已经给出 out 目录中生成的文件,下面简单描述一下。

根据 tlsconfig.yml 配置会生成以下文件:

  • 1 份根证书文件【3 个文件,用于 Elasticsearch 配置】:root-ca.keyroot-ca.pemroot-ca.readme
  • 每个 node 生成 1 份证书文件【5 个文件,用于 Elasticsearch 配置】:<node>.key<node>.pem<node>_http.key<node>_http.pem【若密码生成方式设为 auto,密码在各个 node<node>_elasticsearch_config_snippet.yml 文件中找】
  • 客户端 1 份证书文件【5 个文件,用于 sgadmin.sh 执行激活】:client-admin.key、client-admin.pemclient-custom.keyclient-custom.pem【若密码生成方式设为 auto,密码在 client_certificates.readme 中找】
  • 其中,每个 <node>_elasticsearch_config_snippet.yml 文件中的内容,可以直接复制粘贴到每个 Elasticsearch 节点的配置文件中【视情况变更部分配置,例如 searchguard.ssl.http.enabled: false

除了用肉眼检查文件个数是否正确,还要检查证书文件是否合法【校验】,可以使用自带的工具:/tools/sgtlsdiag.sh

例如:./tools/sgtlsdiag.sh -ca out/root-ca.pem -crt out/dev4.pem

  • -ca,创建并指定本地证书授权中心【如果已经存在本地证书授权中心则不需要】
  • -crt,指定 Elasticsearch 节点证书文件

此外,还可以检查 Elasticsearch 节点的配置是否正确:

1
./tools/sgtlsdiag.sh -es /etc/elasticsearch/elasticsearch.yml
  • -es,指定 Elasticsearch 配置文件

安装 Search Guard

提示:以下列出的是常规的安装、配置流程,实际操作中,可以提前把一切工作做好【证书生成、配置、插件安装】,然后直接重启 Elasticsearch 集群、激活 Search Guard,实际停机时间很短【保守估计 30 分钟以内,等待集群状态恢复绿色需要几小时到十几小时,视集群的分片恢复能力而定】。

Search Guard 用户权限配置文件参考附件,已被我上传至 GitHubSearch Guard config

禁止重分配

防止停掉 Elasticsearch 节点时自动重分配。

可以在安装 Search Guard 插件之后,并且准备好配置文件之后再执行。

配置更新:

1
2
3
4
5
6
PUT /_cluster/settings/
{
"transient": {
"cluster.routing.allocation.enable": "none"
}
}

停止集群

可以在安装 Search Guard 插件之后,并且准备好配置文件之后再执行。

由运维人员操作。

每个节点安装插件

在线安装:在每个 Elasticsearch 节点上,执行:./bin/elasticsearch-plugin install -b com.floragunn:search-guard-5:5.6.8-19.1【在此使用坐标,或者使用仓库地址链接也可以】。

离线安装:下载安装包到本地,用 zip 包离线安装【在 Windows 系统上面试过:报 unknown plugin,暂未找到原因】。

拷贝证书文件

将前面生成的证书文件拷贝至 Elasticsearchconfig 目录。

包含以下内容:

  • 1 份根证书文件【2 个文件】:root-ca.keyroot-ca.pem
  • 对应 Elasticsearch 节点的 1 份证书文件【4 个文件】:<node>.key<node>.pem<node>_http.key<node>_http.pem
  • 注意:client 客户端 4 个证书文件不需要拷贝,只把 admin 权限的 2 个文件拷贝到某一个节点即可,用于激活管理 Search Guard
  • 4 个证书文件【普通权限 2 个、admin 权限 2 个】,实际会用到 admin 权限的 2 个:client-admin.keyclient-admin.pem【这 4 个证书文件实际是给通过 tcp 访问的客户端使用的,此外在执行 sgadmin.sh 的时候也需要使用】

修改集群配置

修改 elasticsearch.yml 配置文件,见备注部分,建议从 <node>_elasticsearch_config_snippet.yml 中直接复制粘贴,再根据实际情况更改部分内容。

注意:如果要保留 http 方式访问,参数 searchguard.ssl.http.enabled 要设为 false,否则访问会被拒绝。

测试环境这里选择关闭 https 访问,继续使用 http 访问。

重启集群

此过程重要,需要仔细观察,必要时回退。

1、重启,并观察。

如果重启顺利,会在 Elasticsearch 节点日志中看到提示激活 Search Guard 的信息,不顺利的话可能是 Search Guard 相关的参数配置有误,检查修改即可。

如果还有其它无法解决的异常情况,考虑回退。

2、配置 Search Guard,所有的 Elasticsearch 节点都需要,可以提前做好。

Elasticsearchplugins/search-guard-5/sgconfig 目录下,配置好 3 个与权限相关的文件,密码密文由 hash.sh 工具转换:

  • sg_internal_users.yml,用户定义,指定用户名、密码
  • sg_roles.yml,角色定义,用来限制权限,指定 2 种角色
  • sg_roles_mapping.yml,映射关系,指定用户所属的角色,即完成真正的用户权限管理

这里使用的是默认的内部认证,即 basic_internal_auth_domain,在 sgconfig/sg_config.yml 中默认配置,如果使用其它认证方式【例如:ODAPkerberos_auth_domain】,自行更改。

3、激活 Search Guard,只需要选择某 1 个 Elasticsearch 节点,并且需要前面 client-admin 客户端 2 个证书,在 Elasticsearch 集群重启后,在 Elasticsearch 节点的 plugins/search-guard-5/tools 目录下,执行:

1
./sgadmin.sh -icl -nhnv -h dev4 -p 9300 -cd ../sgconfig/-cacert ../../../config/root-ca.pem -cert ../../../config/client-admin.pem -key ../../../config/client-admin.key -keypass JzgDTQIzoTDE

注意各个参数的含义、取值,提前准备好即可:

  • -h,主机名,默认 localhost,指定 1 个 Elasticsearch 节点即可,用于 tcp 通信
  • -p,端口号,不是 http,是 tcp 的,默认 9300
  • -icl,忽略集群名字,不会严格校验
  • -nhnv,忽略主机名验证
  • -keypass,客户端密码,从 client-admin 客户端的 readme 文件中找
  • -cd,配置文件目录
  • -arc,接受红色状态的集群
  • -dci,删除 searchguard 索引,用于激活失败重新激活时删除已经创建的索引
  • -cn,集群名字
  • -sniff,嗅探节点
  • -er,设置索引副本数,默认自动扩展
  • -era,开启索引的副本自动扩展,auto_expand_replicas
  • -dra,关闭索引的副本自动扩展,auto_expand_replicas

备注 Windows 系统的操作:

1
.\sgadmin.bat -icl -nhnv -cd ..\sgconfig\ -cacert ..\..\..\config\root-ca.pem -cert ..\..\..\config\client-admin.pem -key ..\..\..\config\client-admin.key -keypass xx

重启 Elasticsearch 节点后,可以看到 Elasticsearch 节点日志中,一直在提示执行 sgsdmin.sh 激活 Search Guard 插件:Not yet initialized (you may need to run sgadmin)

如果此时有客户端访问 Elasticsearch 节点,会被拒绝:speaks transport plaintext instead of ssl, will close the channel

整体日志内容截取如下:

1
2
3
4
5
6
7
8
9
10
11
12
13
14
15
16
17
18
19
20
21
22
23
[2020-04-24T22:03:56,500][WARN][c.f.s.s.t.SearchGuardSSLNettyTransport] [dev6] Someone (/192.168.1.62:44120) speaks transport plaintext instead of ssl, will close the channel
[2020-04-24T22:03:56,956][ERROR][c.f.s.a.BackendRegistry] Not yet initialized (you may need to run sgadmin)
[2020-04-24T22:03:58,548][ERROR][c.f.s.a.BackendRegistry] Not yet initialized (you may need to run sgadmin)
[2020-04-24T22:03:58,803][ERROR][c.f.s.a.BackendRegistry] Not yet initialized (you may need to run sgadmin)
[2020-04-24T22:04:00,674][ERROR][c.f.s.a.BackendRegistry] Not yet initialized (you may need to run sgadmin)
[2020-04-24T22:04:01,573][WARN][c.f.s.s.t.SearchGuardSSLNettyTransport] [dev6] Someone (/192.168.1.62:44160) speaks transport plaintext instead of ssl, will close the channel
[2020-04-24T22:04:02,502][ERROR][c.f.s.a.BackendRegistry] Not yet initialized (you may need to run sgadmin)
[2020-04-24T22:04:06,586][WARN][c.f.s.s.t.SearchGuardSSLNettyTransport] [dev6] Someone (/192.168.1.62:44190) speaks transport plaintext instead of ssl, will close the channel
[2020-04-24T22:04:06,811][ERROR][c.f.s.a.BackendRegistry] Not yet initialized (you may need to run sgadmin)
[2020-04-24T22:04:10,062][ERROR][c.f.s.a.BackendRegistry] Not yet initialized (you may need to run sgadmin)
[2020-04-24T22:04:11,592][WARN][c.f.s.s.t.SearchGuardSSLNettyTransport] [dev6] Someone (/192.168.1.62:44206) speaks transport plaintext instead of ssl, will close the channel
[2020-04-24T22:04:12,210][ERROR][c.f.s.a.BackendRegistry] Not yet initialized (you may need to run sgadmin)
[2020-04-24T22:04:16,600][WARN][c.f.s.s.t.SearchGuardSSLNettyTransport] [dev6] Someone (/192.168.1.62:44250) speaks transport plaintext instead of ssl, will close the channel
[2020-04-24T22:04:21,609][WARN][c.f.s.s.t.SearchGuardSSLNettyTransport] [dev6] Someone (/192.168.1.62:44284) speaks transport plaintext instead of ssl, will close the channel
[2020-04-24T22:04:26,617][WARN][c.f.s.s.t.SearchGuardSSLNettyTransport] [dev6] Someone (/192.168.1.62:44308) speaks transport plaintext instead of ssl, will close the channel
[2020-04-24T22:04:31,624][WARN][c.f.s.s.t.SearchGuardSSLNettyTransport] [dev6] Someone (/192.168.1.62:44340) speaks transport plaintext instead of ssl, will close the channel
[2020-04-24T22:04:36,632][WARN][c.f.s.s.t.SearchGuardSSLNettyTransport] [dev6] Someone (/192.168.1.62:44370) speaks transport plaintext instead of ssl, will close the channel
[2020-04-24T22:04:41,639][WARN][c.f.s.s.t.SearchGuardSSLNettyTransport] [dev6] Someone (/192.168.1.62:44388) speaks transport plaintext instead of ssl, will close the channel
[2020-04-24T22:04:46,647][WARN][c.f.s.s.t.SearchGuardSSLNettyTransport] [dev6] Someone (/192.168.1.62:44422) speaks transport plaintext instead of ssl, will close the channel
[2020-04-24T22:04:51,656][WARN][c.f.s.s.t.SearchGuardSSLNettyTransport] [dev6] Someone (/192.168.1.62:44462) speaks transport plaintext instead of ssl, will close the channel
[2020-04-24T22:04:56,666][WARN][c.f.s.s.t.SearchGuardSSLNettyTransport] [dev6] Someone (/192.168.1.62:44488) speaks transport plaintext instead of ssl, will close the channel
[2020-04-24T22:05:01,624][ERROR][c.f.s.a.BackendRegistry] Not yet initialized (you may need to run sgadmin)
[2020-04-24T22:05:01,677][WARN][c.f.s.s.t.SearchGuardSSLNettyTransport] [dev6] Someone (/192.168.1.62:44524) speaks transport plaintext instead of ssl, will close the channel

由于 Search Guard 需要创建自己的索引,如果关闭了自动分配,新创建的索引从分片可能无法分配,Search Guard 激活过程会卡住,可以选择 -esa 参数,如果集群分片很多,需要开启,否则 SearchGuard 的主分片等待初始化需要很久。如果 Elasticsearch 集群默认是开启了自动分配,无需关心此问题。

通过测试发现 Search Guard 开启了分片自动扩展,实际初始时只有 1 个主分片,可以分配成功。但是注意副本数太多,自动扩展【index.auto_expand_replicas 设置为 0-all】是根据可用 Elasticsearch 节点来设置副本数的,实际中没必要【设置为 false】,并且把副本数减小【参数 index.number_of_replicas】,例如设置为 2 或者 3。

集群黄色的时候创建索引无法成功,一直在等待【大概率是因为测试环境的分片太多,加上刚刚重启,分配太慢了,等了至少 20 分钟还在等待,看 Elasticsearch 节点的日志,put mapping 超时】,后来等集群绿色的时候很快创建成功。

顺利执行 sgadmin.sh 激活插件的日志:

1
2
3
4
5
6
7
8
9
10
11
12
13
14
15
16
17
18
19
20
21
22
23
24
25
26
27
28
29
30
31
32
33
34
35
36
37
38
39
40
Search Guard Admin v5
Will connect to dev6:9300 ... done

### LICENSE NOTICE Search Guard ###

If you use one or more of the following features in production
make sure you have a valid Search Guard license
(See https://floragunn.com/searchguard-validate-license)

* Kibana Multitenancy
* LDAP authentication/authorization
* Active Directory authentication/authorization
* REST Management API
* JSON Web Token (JWT) authentication/authorization
* Kerberos authentication/authorization
* Document- and Fieldlevel Security (DLS/FLS)
* Auditlogging

In case of any doubt mail to <sales@floragunn.com>
###################################
Elasticsearch Version: 5.6.8
Search Guard Version: 5.6.8-19.1
Contacting elasticsearch cluster 'elasticsearch' and wait for YELLOW clusterstate ...
Clustername: dev_es_cluster
Clusterstate: GREEN
Number of nodes: 3
Number of data nodes: 3
searchguard index does not exists, attempt to create it ... done (0-all replicas)
Populate config from /opt/package/elasticsearch-dev_es_cluster/plugins/search-guard-5/sgconfig
Will update 'config' with ../sgconfig/sg_config.yml
SUCC: Configuration for 'config' created or updated
Will update 'roles' with ../sgconfig/sg_roles.yml
SUCC: Configuration for 'roles' created or updated
Will update 'rolesmapping' with ../sgconfig/sg_roles_mapping.yml
SUCC: Configuration for 'rolesmapping' created or updated
Will update 'internalusers' with ../sgconfig/sg_internal_users.yml
SUCC: Configuration for 'internalusers' created or updated
Will update 'actiongroups' with ../sgconfig/sg_action_groups.yml
SUCC: Configuration for 'actiongroups' created or updated
Done with success

4、后续修改权限,如果后续需要新增帐号、变更密码等操作,直接更新 Search Guard 的 3 个配置文件,重新执行一次激活步骤即可。

也就说 Search Guard 插件安装激活成功后,帐号权限可以使用 sgadmin.sh 管理,通过更新配置文件,支持添加、删除角色、帐号。

5、开启 Elasticsearch 重分配,在重启 Elasticsearch 集群恢复绿色之后再执行,如果集群默认是开启的,会自动开启,无需关心。

配置更新:

1
2
3
4
5
6
PUT /_cluster/settings/
{
"transient": {
"cluster.routing.allocation.enable": "all"
}
}

简单验证

可以打开集群详情页面:http://dev4:9200 ,提示需要输入用户名、密码。

或者打开 Search Guard 帐号详情页面进行简单验证:http://dev4:9200/_searchguard/authinfo ,提示需要输入用户名、密码查看帐号信息。

启动后,如果没有激活 Search Guard,无法查看 Elasticsearch 集群的状态,集群详情页面显示:

1
Search Guard not initialized (SG11). See https://github.com/floragunncom/search-guard-docs/blob/master/sgadmin.md

只要登录后,此时使用 head 插件或者 sense 工具都可以正常访问。

部分配置信息

提示:

1、network.host: 0.0.0.0,避免执行 sgadmin.sh 命令时报错。

2、xpack.security.enabled: false,禁用 xpack

3、es-head 支持:http://[es-head]:9100/?base_uri=https://[es-node]:9200&auth_user=xx&auth_password=yy

1
2
3
http.cors.enabled: true
http.cors.allow-origin: "*"
http.cors.allow-headers: "Authorization,X-Requested-With,-Content-Length,Content-Type"

备注

以下配置文件信息仅供参考,实际部署时,Elasticsearch 配置信息随证书而生成,直接复制即可,权限配置信息由实际情况而定。

参考链接:internal-users-database

用户配置

sg_internal_users.yml 为用户信息配置,包含用户名、密码及角色【这里的角色是后台角色,不是 sg 角色,目前用不到,不用配置,以最终的 sg_roles_mapping.yml 为准】。

密码 hash 使用自带的脚本生成:./tools/hasher.sh -p mycleartextpassword

1
2
3
4
5
6
7
8
9
10
11
12
13
14
admin:
hash: $2a$12$qDsJtWx/IIkqhOVZXKh4M.bBLpjBmG6tL00vNhsfb4WS6wH7M1M3C
#password is: admin-!#%
#roles:
# - admin
# - can-read-all
# - can-write-all

custom:
hash: $2a$12$URJTPgsK9v7iYcq/dAYJVeH2t/VftkoHr2DraNnYS/ooqW3sZrJhS
#password is: custom-$@~
#roles:
# - custom
# - can-read-all

角色配置

sg_roles.yml 为角色权限配置【定义 2 种角色】,可自定义角色名及其权限。

1
2
3
4
5
6
7
8
9
10
11
12
13
14
15
16
17
18
admin:
cluster:
- UNLIMITED
indices:
'*':
'*':
- UNLIMITED

custom:
cluster:
- CLUSTER_MONITOR
- CLUSTER_COMPOSITE_OPS_RO
- indices:data/read/scroll*
indices:
'*':
'*':
- READ
- SEARCH

关联权限配置

sg_roles_mapping.yml 角色、用户的映射【2 个用户分属于 2 种角色】,必须在这里配置映射,只在第一个 sg_internal_users.yml 文件配置用户的后台角色不生效。

1
2
3
4
5
6
7
admin:
users:
- admin

custom:
users:
- custom

Elasticsearch 配置

elasticsearch.yml 中增加以下与 Search Guard 相关的配置,以 dev4 作为示例:

1
2
3
4
5
6
7
8
9
10
11
12
13
14
15
16
17
searchguard.ssl.transport.pemcert_filepath: dev4.pem
searchguard.ssl.transport.pemkey_filepath: dev4.key
searchguard.ssl.transport.pemkey_password: 9NdKF2PBoU8A
searchguard.ssl.transport.pemtrustedcas_filepath: root-ca.pem
searchguard.ssl.transport.enforce_hostname_verification: false
searchguard.ssl.transport.resolve_hostname: false
searchguard.ssl.http.enabled: false
searchguard.ssl.http.pemcert_filepath: dev4_http.pem
searchguard.ssl.http.pemkey_filepath: dev4_http.key
searchguard.ssl.http.pemkey_password: YVI8mGC654TQ
searchguard.ssl.http.pemtrustedcas_filepath: root-ca.pem
searchguard.nodes_dn:
- CN=dev4.playpi.com,OU=Ops,O=Playpi Com\, Inc.,DC=playpi,DC=com
- CN=dev5.playpi.com,OU=Ops,O=Playpi Com\, Inc.,DC=playpi,DC=com
- CN=dev6.playpi.com,OU=Ops,O=Playpi Com\, Inc.,DC=playpi,DC=com
searchguard.authcz.admin_dn:
- CN=client-admin.playpi.com,OU=Ops,O=Playpi Com\, Inc.,DC=playpi,DC=com

一些问题

0、在线生成证书文件,Search Guard 也提供了在线生成证书文件的工具,见:tls-certificate-generator ,但是如果 Elasticsearch 节点很多,配置也就多,还是通过离线工具自己生成比较方便,效果是一样的。

1、嗅探问题,可以同步开启,集群节点自动更新,避免单个 Elasticsearch 节点出问题出现超时异常。

TransportClient 方式有参数 client.transport.sniff 对应,设置为 true 即可。

HTTP 方式有 Sniffer.builder () 方法,可以使用:

1
2
3
RestClientBuilder builder = RestClient.builder (hosts);
RestHighLevelClient restHighLevelClient = new RestHighLevelClient (builder);
Sniffer sniffer = Sniffer.builder (restHighLevelClient.getLowLevelClient ()).build ();

2、节点变更新增证书

如果有 Elasticsearch 节点被移除,则可以直接移除。但是如果有 Elasticsearch 节点需要被添加进入集群,证书怎么生成?

也是可以的,即可以手动生成证书文件,但是要保留当前生成的 ca 授权中心,即第一次生成证书时指定 -ca 参数输出到 out 目录的 root-xx 这 3 个文件。都很重要,一定要保留【要把 configout 目录保留,甚至整个 search-guard-tlstool 目录保留,以后可以直接使用】。

config 中,就是一些配置文件,很重要,在 out 中,其中 root-ca.readme 用来查看密码,很重要,root-ca.pemroot-ca.key 是秘钥文件,也很重要。

以后需要添加 Elasticsearch 节点时,需要申请证书,必须利用这个 ca 授权中心,否则生成的证书无法使用。

准备完成后,具体操作:

root-ca.readme 中的密码配置在 config/tlsconfig.yml 文件的 ca -> root -> pkPassword 值上面【表示用这个密码、root-ca 来生成新的证书,第一次使用时配置的是 auto】,然后根据 Elasticsearch 节点名称配置 nodes 项。

然后生成证书时,去掉 -ca 参数,则会默认使用本地的 ca,即 out 里面的 root-ca,它会自动对比配置中的 nodes 节点和 out 目录中以前的证书文件,如果存在则跳过,不存在时会生成【即为新 Elasticsearch 节点生成可用的证书】。

备注 Windows 操作:

1
2
3
4
5
6
7
8
9
10
.\tools\sgtlstool.bat -c .\config\tlsconfig.yml -crt

输出日志中会显示跳过了什么,生成了什么。

xx.key does already exist. Skipping creation of certificate for yy
...
...
Created 2 node certificates.
Passwords for the private keys of the node certificates have been auto-generated.
The passwords are stored in the config snippet files.

2020-06-06 追加内容:

在实际操作中,发现了问题,导致无法新增节点,对于新生成的证书,由于 nodesDn 不在集群的列表中,无法被识别,总是有异常:

1
2
3
4
5
6
7
8
9
10
11
12
13
14
15
16
17
18
[2020-06-04T22:53:18,346][WARN][o.e.d.z.UnicastZenPing] [xx_node0] [1] failed send ping to {#zen_unicast_xx:9300_0#}{07QOvQd_Q9KEO7FIxcpzAQ}{xx}{192.168.1.x:9300}
java.lang.IllegalStateException: handshake failed with {#zen_unicast_xx:9302_0#}{07QOvQd_Q9KEO7FIxcpzAQ}{xx}{192.168.20.x:9300}
at org.elasticsearch.transport.TransportService.handshake (TransportService.java:413) ~[elasticsearch-5.6.8.jar:5.6.8]
at org.elasticsearch.transport.TransportService.handshake (TransportService.java:380) ~[elasticsearch-5.6.8.jar:5.6.8]
at org.elasticsearch.discovery.zen.UnicastZenPing$PingingRound.getOrConnect (UnicastZenPing.java:400) ~[elasticsearch-5.6.8.jar:5.6.8]
at org.elasticsearch.discovery.zen.UnicastZenPing$3.doRun (UnicastZenPing.java:507) [elasticsearch-5.6.8.jar:5.6.8]
at org.elasticsearch.common.util.concurrent.ThreadContext$ContextPreservingAbstractRunnable.doRun (ThreadContext.java:674) [elasticsearch-5.6.8.jar:5.6.8]
at org.elasticsearch.common.util.concurrent.AbstractRunnable.run (AbstractRunnable.java:37) [elasticsearch-5.6.8.jar:5.6.8]
at java.util.concurrent.ThreadPoolExecutor.runWorker (ThreadPoolExecutor.java:1149) [?:1.8.0_161]
at java.util.concurrent.ThreadPoolExecutor$Worker.run (ThreadPoolExecutor.java:624) [?:1.8.0_161]
at java.lang.Thread.run (Thread.java:748) [?:1.8.0_161]
Caused by: org.elasticsearch.transport.RemoteTransportException: [xx_master][192.168.20.x:9300][internal:transport/handshake]
Caused by: org.elasticsearch.ElasticsearchException: Illegal parameter in http or transport request found.
This means that one node try to connect to another with
a non-node certificate (no OID or searchguard.nodes_dn incorrect configured) or that someone
is spoofing requests. Check you TLS certificate setup as described here: See http://docs.search-guard.com/latest/troubleshooting-tls
at com.floragunn.searchguard.ssl.util.ExceptionUtils.createBadHeaderException (ExceptionUtils.java:58) ~[?:?]
at com.floragunn.searchguard.transport.SearchGuardRequestHandler.messageReceivedDecorate (SearchGuardRequestHandler.java:165) ~[?:?]

此时去更新集群中所有节点的 elasticsearch.yml 配置文件中的 searchguard.nodes_dn 属性也没有用处了,新增节点始终无法加入集群。

通过分析,发现了问题所在:

一开始安装插件时,searchguard.nodes_dn: 配置项没有使用正则通配符的方式,导致后续的新增节点证书无法被识别,进而新增节点无法加入集群。

同时,一开始生成证书时没有使用 nodeOid 配置,导致无法使用 searchguard.cert.oid 来标记合法的证书,新增节点无法加入集群。

那么,解决方案也就有两种,一是重新配置 searchguard.nodes_dn: 项,并重启集群;二是使用 nodeOid 配置的方式重新生成证书,更改所有配置,重启集群。

3、单物理机多节点证书问题

开发环境中的 Elasticsearch 节点是一台物理机上有 2 个 Elasticsearch 节点,它们的节点名称不一样,但是 ip 是一样的,这种仍旧需要生成 2 份证书【每个 Elasticsearch 节点 1 份】,配置时全部使用 Elasticsearch 节点的名字来配置,多个 nodeip 地址可以一样。

4、用户更新

以后如果需要变更 SaerchGuard 的用户,例如新增、删除、添加权限,不需要重启 Elasticsearch 集群了,直接更改与权限相关的那几个配置文件就行,然后使用 ./sgadmin.sh 工具重新激活一次即可。

5、TransportClient 方式使用起来比较麻烦,需要证书文件,以及很多配置【类似于 Search GuardElasticsearch 中的那些配置】,本质是通过 tcpElasticsearch 进行连接【所以不需要密码了,证书已经表明了合法用户】。详细使用方式以及权限管理参考:transport-clients

条件描述:

The Transport Client needs to identify itself against the cluster by sending a trusted TLS certificate
For that, you need to specify the location of your keystore and truststore containing the respective certificates
A role with appropriate permissions has to be configured in Search Guard, either based on the hostname of the client, or the DN of the certificate

当然,集群层面也需要开启相应的配置。

首先在配置文件 sgconfig/sg_config.yml 中开启认证方式:

1
2
3
4
5
6
transport_auth_domain:
enabled: true
order: 2
http_authenticator:
authentication_backend:
type: internal

其次需要证书完整的 DN 信息,配置在 sgconfig/sg_internal_users.yml 文件中:

1
2
CN=root-ca.playpi.com, OU=Ops, O="Playpi Com, Inc.", DC=playpi, DC=com
hash: $2a$12$1HqHxm3QTfzwkse7vwzhFOV4gDv787cZ8BwmCwNEyJhn0CZoo8VVu

当然,如果忘记了 DN 信息,可以使用 Java 自带的工具获取:

1
keytool -printcert -file ./config/client-custom.pem

同样,需要在角色映射文件 sgconfig/sg_roles_mapping.yml 中配置:

1
2
3
4
5
6
custom:
users:
- custom
- 'root-ca.playpi.com, OU=Ops, O="Playpi Com, Inc.", DC=playpi, DC=com'

注意单引号的使用
虾丸派 wechat
扫一扫添加博主,进技术交流群,共同学习进步
永不止步
0%